
Kitchen islands have become increasingly popular in modern homes, providing more workspace and storage options for homeowners. However, the question remains: do kitchen islands need outlets?
Having outlets on a kitchen island makes powering appliances such as blenders, mixers, and toaster ovens easier. Not only do electrical outlets make your kitchen more functional, but they also improve its aesthetics by hiding cords and wires.
Most kitchen islands require outlets for safety and convenience purposes. The National Electrical Code (NEC) provides specific requirements for installing receptacles on kitchen islands and peninsulas.
In this blog post, we’ll discuss why a kitchen island needs an outlet and also teach you how to install an electrical outlet step-by-step.
Jump to Section
Why Does a Kitchen Island Need an Outlet?
A kitchen island needs an outlet for several reasons, primarily to meet electrical code requirements and to provide convenience and functionality in the kitchen.
Here are some reasons why a kitchen island requires an outlet:
- No 01: Electrical Code Compliance
- No 02: Powering Appliances and Devices
- No 03: Accessibility and Convenience
- No 04: Kitchen Design and Aesthetics
- No 05: Increased Functionality
- No 06: Future-Proofing
No 01: Electrical Code Compliance
The National Electrical Code requires outlets on kitchen islands with countertops larger than 12-by-24 inches. It ensures that electrical installations in residential and commercial settings function properly and are free of potential hazards.
No 02: Powering Appliances and Devices
With an outlet installed on your kitchen island, you can safely operate small appliances such as blenders, mixers, toasters, and coffee makers. There are no tangled cords or tripping hazards when using this product.
Also, having a power source on your island allows you to charge laptops, tablets, smartphones, and other electronics while working in the kitchen. This means staying connected and productive while preparing meals for entertaining guests.
No 03: Accessibility and Convenience
Installing an outlet on your kitchen island eliminates the hassle of stretching cords across the room or relying on inconvenient extension cords. Also, it protects against electrical fires caused by overloaded circuits and reduces tripping hazards.
It is convenient and productive to have an outlet available when preparing meals, using small appliances, or charging gadgets.
No 04: Kitchen Design and Aesthetics
By installing an outlet, you can seamlessly integrate appliances and devices without compromising the overall aesthetics of the space.
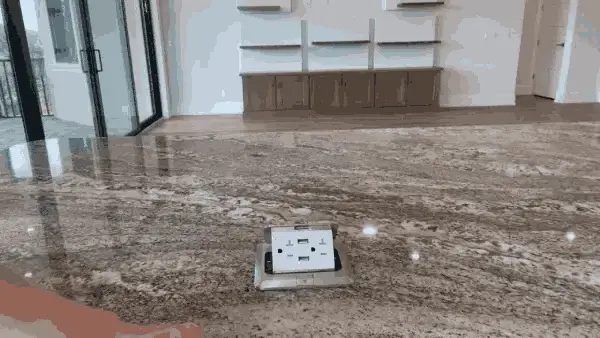
With a pop-up outlet, you can keep the backsplash and island surfaces clutter-free, making for a more streamlined and visually appealing kitchen. This detail-oriented approach not only improves accessibility but also elevates your kitchen’s design while providing added convenience.
No 05: Increased Functionality
Adding an outlet to your kitchen island will allow you to use small appliances and devices effortlessly while cooking or entertaining.
You can plug in your blender to make a smoothie or margarita without moving it across the room or use your stand mixer for baking right where you need it.
An island outlet also gives you flexibility in arranging your kitchen layout, so you can place appliances and work areas wherever you like. This can help increase efficiency and productivity in the kitchen, making meal preparation a breeze.
No 06: Future-Proofing
With an outlet at your kitchen island, you can easily add new technologies or appliances in the future, like charging stations or small appliances.
Also, the beauty of this upgrade is that it doesn’t involve any major renovations or modifications. By future-proofing your kitchen, you will stay ahead of the technology curve.
How Do You Set Up an Electrical Outlet in a Kitchen Island?

To install an outlet on a kitchen island, you can follow the step-by-step process outlined below:
- Step 01: Gather the Necessary Tools
- Step 02: Plan the Location
- Step 03: Cut a Hole for the Receptacle Box
- Step 04: Install a Junction Box in the Crawl Space
- Step 05: Sleeve and Fish the Wires
- Step 06: Estimate Wire Length and Make Connections
- Step 07: Tighten the Connections
- Step 08: Label the Cover Plate
- Step 09: Finalize the Installation
Get your multi-tool and head to the shallow receptacle box. You’ll need a junction box, PVC pipes, wire cutters/strippers, a drill, and a label maker for assembling the electrical system for your kitchen island.
The junction box will serve as a central hub, while PVC pipes will protect the wires. Remember to strip each wire’s end before connecting them to their terminals in the junction box.
You’ll want to ensure that your outlet won’t interfere with any hardware or drawers when planning where to place it.
Determine a location that is easily accessible for electrical devices and appliances while also maintaining the functionality of the island’s storage space.
You should consider the height and reach of the outlet, as well as any potential safety concerns.
Carefully use a multi-tool to cut the perfect hole in your kitchen island for the shallow receptacle box. This will ensure a seamless installation and a functional workspace.
You need to make sure that the size of the hole matches the dimensions of the receptacle box for a secure fit of the outlet.
When cutting the hole, avoid damaging any wiring or plumbing that may be in close proximity. Be sure to measure and mark out your cutting area before beginning, and use caution when working with power tools.
Now that you’ve drilled a hole in the receptacle box, it’s time to attach the junction box. The key is to find a suitable area beneath the kitchen island to accommodate the junction box.
To avoid any electrical hazards, make sure you have enough space for all the cables and make sure they’re properly connected.
To ensure proper insulation and prevent damage, sleeve the wires in PVC pipes before securing them in the junction box.
This process will help protect the wires from any potential hazards or interference that could cause harm or malfunction.
You can sleeve the exposed wires by cutting a length of PVC pipe long enough to cover them all. Then use a fish tape or cable ties to secure the sleeve in place.
Before connecting the wires, measure their length and cut them accordingly, leaving sufficient slack for flexibility. Cut the wires carefully, ensuring they’re long enough to reach their respective terminals without tension or strain.
You can use wire strippers to remove insulation from both ends of each wire before looping them around their designated terminal screws. Make sure your connections are tight and secure using pliers or a screwdriver to fasten everything in place.
You can easily ensure a solid and reliable electrical connection by tightening the receptacle connections using a drill with the appropriate setting. Loose connections can lead to electrical problems such as shorts or even fires.
Using a label maker, attach a label to the cover plate to specify that the island circuits are on a dedicated 20-amp circuit. It helps people know that the outlets are designed specifically for powerhouse kitchen appliances like blenders, mixers, and microwaves.
In the absence of this label, an electrical fire or blown fuse could happen if you plug in something that uses more power than the outlet can handle.
After the installation, attach the cover plate to the receptacle box and label it for high-powered kitchen appliances only. Double-check that all wires are properly connected and secured prior to turning on the power to the outlet.
Ensure you verify that this outlet is equipped to handle heavy loads so that it won’t overload your electrical system. Then, test the outlet to ensure it’s working properly before using it for any appliances or devices.
Can you add an outlet to your existing kitchen island?
You can easily add an outlet to your existing kitchen island by cutting a hole, installing a box, and running the wire through a conduit.
But, it’s crucial to follow electrical code requirements and take safety precautions during the installation process.
Consult a professional electrician if you need clarification on the proper installation technique.
Do I need GFCI outlets on a kitchen island?
Yes, you absolutely need GFCI outlets on a kitchen island. According to the National Electrical Code, all countertop outlets in the kitchen must be Ground Fault Circuit Interrupter (GFCI) protected, including those on kitchen islands.
Any outlet that might come into contact with water, either from the sink or from a countertop appliance, needs this kind of protection to prevent electric shock.
Safety should always be the first priority, especially in an area like a kitchen where water and electricity are frequently in close proximity.
Upgrade Your Kitchen Island’s Safety and Convenience with an Electrical Outlet
Electrical outlets in kitchen islands are imperative for both convenience and safety. Without an outlet, one would have to use extension cords that are potential tripping hazards.
Typically, one deep outlet on the island is sufficient for general use, eliminating the need to stretch cords across the room to a wall outlet.
An electrical inspector will likely require at least one outlet to comply with safety regulations. The outlet adds functionality to the kitchen, making the island a more efficient workspace.
Therefore, an outlet should be installed by a qualified electrician to ensure compliance with safety codes. GFCI outlets are recommended as they guarantee protection against electrical shocks.
Adding an outlet to an existing island is also possible but is best left to a licensed electrician. This ensures convenience, safety, and adherence to specific electrical codes.
FAQ’s: Do Kitchen Islands Need Outlets
Do I need an outlet on my kitchen island?
Yes, according to the National Electrical Code (NEC), kitchen islands and peninsulas require an outlet. The code states that at least one receptacle outlet is required on the island or peninsula, regardless of the island’s size or the number of appliances installed on it.
How many outlets do I need on my kitchen island?
According to the 2020 NEC, a kitchen island that is more than 24 inches long and 12 inches wide requires at least one receptacle outlet. However, if the island is longer than 48 inches or has a sink or cooktop, it requires two or more outlets.
Can the outlet be installed on the side of the island?
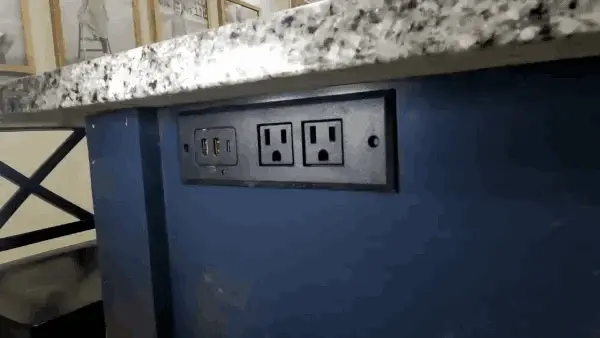
Yes, the outlet can be installed on either end or side of the island, as long as it is within reach of the island countertop space.
Are pop-up outlets allowed on kitchen islands?
Yes, pop-up outlets can be installed on kitchen islands as long as they meet electrical code requirements for island outlets. They provide one receptacle outlet and are designed to be installed flush with the island’s surface, taking up less countertop space than traditional outlets.
Do I need a dedicated circuit for my kitchen island outlet?
It’s a great idea to have a dedicated circuit for outlets on your kitchen island or peninsula because of the potential power requirements of appliances that may be plugged in. Consult with a licensed electrician to determine if you need a dedicated circuit for your specific situation.
Conclusion
In conclusion, installing outlets in a kitchen island counter is not only practical but often required by electrical inspectors.
The type of island, whether its long dimension installed with cabinets or the short dimension with free-standing, may influence where you put the outlet.
So, invest in the safety and convenience of your kitchen by adding an outlet to your kitchen island.