
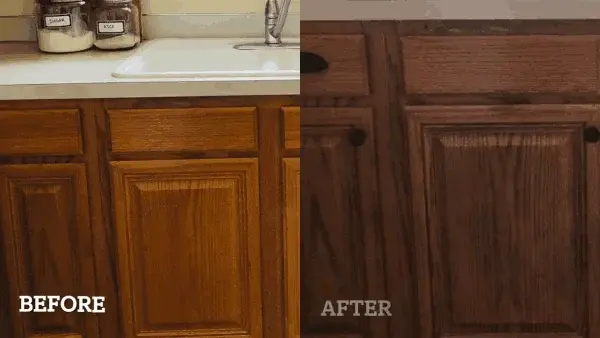
Transform your kitchen on a budget with stunning wooden cabinet restoration. Not only will you enhance the aesthetic appeal, but you’ll also contribute to a greener planet by reducing wood waste.
To restore your wooden kitchen cabinets, you first need to clean the cabinets thoroughly using a wood cleaner and damp cloth. After that, remove the old finish using sandpaper. Then inspect the damage and repair it. Finally, sand the cabinets smoothly to create a clean surface for refinishing.
Unlock the secrets to rejuvenating your tired wooden kitchen cabinets with our foolproof step-by-step guide. Find expert tips and tricks to bring out the breathtaking beauty of your cabinets. Get ready to witness a transformation like never before! Let’s start your cabinet revival journey right away.
How to Restore Wooden Kitchen Cabinets: Step-by-Step Procedures

Restoring your wooden kitchen cabinets is easier and less expensive than replacing them. And the best part is you can do it yourself with some easy steps, without the help of a professional. So let’s check these steps:
- Step 1: Gather necessary supplies
- Step 2: Clean cabinets thoroughly
- Step 3: Remove the old finish
- Step 4: Repair any damage
- Step 5: Sand cabinets smooth
- Step 6: Apply desired stain or paint
- Step 7: Seal cabinets for protection
Step 1: Gather Necessary Supplies
Gather all the necessary supplies to bring life back into your worn-out wooden kitchen cabinets. These include:
- Dust mask
- Safety goggles
- Rubber gloves
- Drop cloth / sanding sponge
- Cleaning or stripping solution (degreaser or vinegar and water)
- Sandpaper (medium and fine-grit)
- Sanding block or power sander
- Protective wood sealer
- Paint stripper (if applicable)
- Stain or paint
- Paint brush
- Clear finish (polyurethane or wax)
- Steel wool
Step 2: Clean Cabinets Thoroughly
Start by removing all the cabinet doors and hardware, allowing you to access every nook and cranny for a thorough cleaning. Lay a drop cloth on your work area to protect it from any mess.
To clean the cabinets effectively, we recommend using a powerful degreaser or combining vinegar and water with cleaning the cabinets effectively. Apply this solution to each cabinet, ensuring that you cover every surface. Take extra care to remove any accumulated grease, dirt, or grime that may have built up over time.
Once you’ve thoroughly cleaned each cabinet, rinse them with water and allow them to dry completely, or it will make the surface sticky.
Step 3: Remove the Old Finish
Once the cabinets are thoroughly cleaned and dry, it’s time to uncover the natural wood grain or achieve a smooth surface by removing the old finish. To start this process, wear a dust mask, safety goggles, and rubber gloves for protection.

Follow the instructions provided by the paint stripper manufacturer carefully. Apply the paint stripper onto the cabinet surfaces and let it sit for the recommended time.
Once the old finish has softened, use a sharp scraper to scrape off the loosened finish gently. Be careful not to damage the wood underneath. After scraping off the old finish, we suggest you wipe away any residue with a clean cloth to ensure a clean surface for refinishing or repainting your kitchen cabinets.
Step 4: Repair Any Damage
Now that the old finish has been removed, it’s time to give your cabinets a flawless makeover by repairing any dents or scratches with wood filler.
Begin by carefully applying the wood filler to each damaged area, ensuring it completely fills the space. Use a putty knife or spatula to smooth the surface, removing excess filler. Allow the wood filler ample time to dry completely before proceeding.
Step 5: Sand Cabinets Smooth
To achieve a flawless and professional finish, you’ll want to ensure that every inch of your cabinets is smooth as silk. This is where the sanding process comes in. Start by grabbing medium-grit sandpaper and get ready to work those muscles.
For maximum efficiency and effectiveness, we suggest using a sanding block or power sander for maximum efficiency and effectiveness. Begin sanding each cabinet, paying close attention to rough areas or imperfections. Take your time with this step, applying even pressure for consistent results.
Once you’ve achieved a generally smooth surface, it’s time to take it up a notch. Switch to fine-grit sandpaper and give those cabinets another pass. This will help remove any remaining scratches or blemishes, leaving you with a beautifully polished surface.
Step 6: Apply Desired Stain or Paint
Get ready to make your cabinets truly shine by applying the perfect stain or paint. It’s time to transform their appearance after sanding them smoothly in the previous step.
Choose a color and finish that will complement your kitchen’s overall aesthetic. Grab a brush or roller and carefully coat each cabinet surface to apply the desired stain or paint. Ensure even coverage and remember any crevices or corners.
If necessary, reapply a coat to achieve the desired depth of color or sheen. Allow each coat to dry completely per the manufacturer’s instructions before continuing.
Step 7: Seal Cabinets for Protection
After applying the desired stain or paint, we suggest you protect your wooden kitchen cabinets from daily wear and tear. Sealing them will provide an extra layer of defense against moisture, heat, and scratches, preserving their pristine appearance for years.

Choose a high-quality clear finish such as polyurethane or wax to seal your cabinets effectively. Use a brush or roller to apply an even coat of the clear finish over the entire surface. If necessary, apply a second coat following the manufacturer’s instructions for drying time between coats.
Once dry, inspect the surface for any uneven spots. Try gently rubbing them with steel wool to smooth out imperfections and create a flawless finish.
What is the best oil to restore kitchen wood cabinets?
We recommend using linseed and tung oils to restore the look and feel of your kitchen cabinets. These traditional oils have been used for centuries to restore and protect wood, making them the perfect choice for revitalizing your wooden kitchen cabinets.
Linseed and tung oils are easy to use and affordable, making them a popular option among homeowners worldwide. These oils enhance the natural beauty of wood by bringing out its rich colors and unique grain patterns.
When restoring kitchen wood cabinets, linseed, and tung oils are unrivaled in their ability to penetrate the wood deeply, nourishing it from within. They provide a protective barrier that helps prevent damage from moisture, heat, and everyday wear and tear.
FAQ’s: How to Restore Wooden Kitchen Cabinets
Can I restore my kitchen cabinets without painting?
If you’re looking for a hassle-free way to bring your kitchen old cabinets back to life, you can restore them without painting. With RESTOR-A-FINISH or FEED-N-WAX, you can revive the beauty of your wooden cabinets without the need for paint.
One of the users says RESTOR-A-FINISH works amazingly well if your cabinets have minor scratches and no major damage. After 2 coats with a 0000 steel wool sponge, this product quickly restores their cherished antique Mahogany dining table luster and color, giving them a fresh look.
Also, according to a seasoned woodworker, if your old kitchen cabinets are in good condition with no visible flaws, FEED-N-WAX would be a game-changer. It’ll nourish and protect the wood while providing a natural shine, and its pleasantly addictive fragrance will enhance the application experience.
What is the best wood cabinet restorer?
We strongly encourage choosing a polymer-based formula restorer for the best restoration of your wood cabinets. They can fill in scratches and rejuvenate sealed woods, Formica, and other surfaces. Not only do they restore the natural beauty of your cabinets, but they also provide a long-lasting shine that is sure to impress.
Also, these restorers seal and protect your cabinets from dust, spills, and stains, ensuring their longevity. Their easy application process makes it convenient for anyone to use them without any professional assistance required.
Can I use Dawn dish soap on wooden kitchen cabinets before restoring them?
Professionals have trusted Dawn dish soap for its grease-cutting abilities, making it an excellent choice for tackling stubborn messes on various surfaces. However, when using wooden cabinets, caution is advised.
While Dawn Platinum can effectively remove grease from other surfaces, it may only be suitable for some wood finishes. If your cabinets have a protective sealant or finish that can withstand gentle scrubbing with Dawn dish soap, then prepping them before restoration could be a viable option.
So before applying any product to your wooden cabinets, test a small inconspicuous area first to ensure compatibility and avoid potential damage.
How can I repair scratches in the wood before refinishing?
Before refinishing, you can repair any holes or scratches in the wood by filling them with wood filler, sanding the area smooth, and then proceeding with the refinishing process.
Can I use water-based stain on my cabinets with stain?
Yes, you can use water-based stain on your cabinets with stain. It is important to properly prepare and clean the surface before applying the stain for best results.
Do I need to apply a protective sealer after refinishing my cabinets?
Yes, it is recommended to apply a protective wood sealer, such as polyurethane varnish or shellac, after refinishing your cabinets to provide durability and protection to the wood surface.
Conclusion
Restoring wooden kitchen cabinets can be a meticulous and rewarding process. Following the step-by-step procedures outlined above, you can bring new life to your cabinets without needing painting.
When choosing a wood cabinet restorer, opt for high-quality products designed for this purpose. While Dawn dish soap can be used to clean your cabinets before restoration, choose the best oil for restoring kitchen wood cabinets that nourishes and protects the wood while enhancing its natural beauty.