
A microwave takes up excessive countertop space and can be annoying if placed in another area. So you may want to consider installing it in your pantry instead. Is it really possible to put a microwave in your pantry to free up counter space?
You can install your microwave in a pantry to free up countertop space and keep your kitchen clutter-free. But you must ensure there are electrical outlets and a sturdy shelf to support its weight without falling.
Also, consider the placement of the exhaust vent, leaving a few inches open in that area to avoid any potential obstructions.
Today we will discuss how to prepare your pantry for storing a microwave and considerations when placing your microwave.
Can You Put Your Microwave in Your Pantry: Possible With 10 Steps
If you wish to prepare your pantry for the placement of a microwave, follow these steps:
- Step 1. Measure your microwave & pantry walls
- Step 2. Remove all the pantry belongings
- Step 3. Remove the wire shelf
- Step 4. Draw a plan for a self and electrical outlet
- Step 5. Install a sturdy shelf for the microwave
- Step 6. Repair and paint walls and trim (if needed)
- Step 7. Install microwave in pantry
Step 1. Measure Your Microwave & Pantry Walls
When measuring your microwave and pantry walls, take a moment to envision the perfect fit for your compact kitchen space.
Begin by measuring the width, height, and depth of your microwave. Make sure to account for any protrusions, such as handles or knobs.
Next, measure the width and height of your pantry walls where you plan to place the microwave. Take note of any obstructions, such as shelves or cabinets that may limit the available space.
Ensure there is enough ventilation clearance if required by your microwave model. Consider leaving extra room around the sides and top for easy access and maintenance.
Step 2. Remove All the Pantry Belongings
Clear out all the belongings from your pantry to ensure you have enough space for your microwave. Start by removing all the items stored in your pantry, such as canned goods, boxes of food, and kitchen supplies.
Next, thoroughly clean the shelves and walls of your pantry to create a fresh and organized space for your microwave. Wipe away any dust or dirt that may have accumulated over time.
Step 3. Remove the Wire Shelf
For your pantry to support your microwave, we recommend replacing any flimsy wire shelves with stronger ones. To remove the wire shelf, follow these steps:
- Examine the shelf and identify any screws or clips holding it in place.
- If there are screws, use a screwdriver to unscrew them one by one until the shelf is free.
- If there are clips, gently pry them with pliers and carefully lift the shelf.
- Be sure to support the weight of the shelf as you remove it to avoid any accidents.
Once the wire shelf is removed, you’ll have a clear area ready for microwave installation in your pantry.
Step 4. Draw a Plan for Self and Electrical Outlet
Draw up a plan to ensure a sturdy shelf and easy access to an electrical outlet. Take a moment to assess the space in your pantry and consider the dimensions of your microwave electrical outlet.
Check your measurements that will help you determine how much space you need for the shelf. Next, locate an electrical outlet that can accommodate your microwave’s power requirements.
Once you have these measurements and information, grab a pencil and paper and begin sketching your plan. Consider incorporating features like adjustable brackets or support beams to ensure stability for your microwave when installing the self.
Also, consider any additional storage needs or aesthetic preferences that could be incorporated into the design. Remember to keep safety in mind and avoid placing the shelf too close to other objects that could cause heat build-up or interfere with ventilation.
Step 5. Install a Sturdy Shelf for the Microwave

Now it’s time to install a sturdy shelf for your microwave. This will ensure convenience and stability in your pantry setup.
Locate the spot on the wall where you want to mount the shelf. Ensure enough space is above for easy access to the microwave controls. We recommend using a leveling tool to ensure the shelf is installed straight. This will prevent any swaying or shakiness.
Once you have determined the placement, drill pilot holes and attach the brackets firmly with screws or nails. This will provide a strong and stable base for the shelf.
Step 6. Repair and Paint Walls and Trim (if needed)
Once the sturdy shelf is installed, it’s time to assess and repair any necessary damage to the walls and trim before giving them a fresh coat of paint.
Start by examining the walls for any imperfections, cracks, or holes. Use a spackling compound to fill in gaps or damaged areas, smoothing it out with a putty knife. Allow it to dry completely before sanding the surface smooth.
Also, inspect the trim for any loose or chipped paint. Carefully remove any loose paint using a scraper and sand down rough edges. To ensure a professional finish, apply primer to the walls and trim before applying your chosen paint color.
You can use a brush to cut around edges and corners, then switch to a roller for larger areas. Allow each coat to dry thoroughly before adding additional layers if needed.
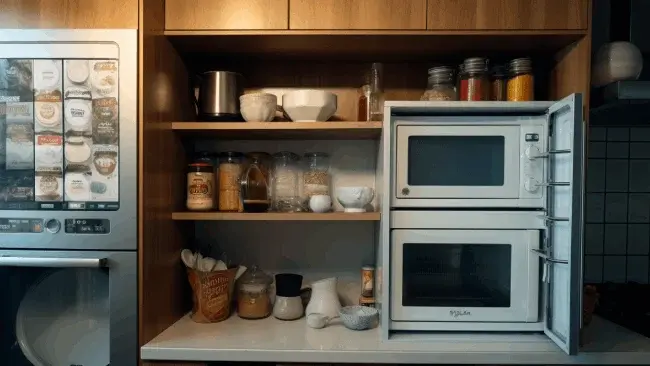
Step 7. Install Microwave in Pantry
After all the repairs and fresh paint, it’s time to bring convenience into your pantry by installing the microwave. This will save you counter space in your kitchen and make heating up meals and snacks a breeze in your pantry.
Alternative Placements for Microwaves Ignoring Pantry
There are alternative solutions to the conventional microwave placement without the pantry, such as:
1. Under the Counter
If you’re looking to free up cabinet space and want easy access to your microwave, placing it under the counter might be your solution. This placement is especially useful if you have an island in your kitchen, as the microwave can be placed at the end of it.
It lets you keep the microwave within arm’s reach while staying out of sight. However, ensure enough clearance space below the counter, as some microwaves may require more vertical space.
2. In a Well-Ventilated Drawer
A well-ventilated drawer for the microwave is an innovative and ergonomic solution for those who want to save counter space. It’s mounted below the counter and can be pulled out like a drawer, making it easy to load and unload.
This placement is perfect for small kitchens where every inch of space counts. While it may lack some of the features of a traditional microwave, a well-ventilated drawer is an excellent option for those who prioritize function.
3. Built-In Microwave Cabinet
Incorporating the microwave into the same lineup can be a great idea if you have a bank of full-height cabinets for your refrigerator and pantry. This placement is ideal for avid cooks who want their microwaves near their food storage to defrost and reheat food quickly.
Also, a built-in microwave cabinet can blend seamlessly with your kitchen cabinetry, making it an excellent option for those who want a cohesive design.
4. In an Appliances Garage
An appliance garage is a minimalist approach to microwave placement. It involves concealing frequently used devices, including your microwave, behind a door. This placement is ideal for those who prioritize aesthetics and want their kitchen counters to be clutter-free.
The door can be a pocket or folding door, making it easy to access your microwave without compromising your kitchen’s aesthetics.
FAQ’s
Can I put a microwave on a pantry wire shelf?
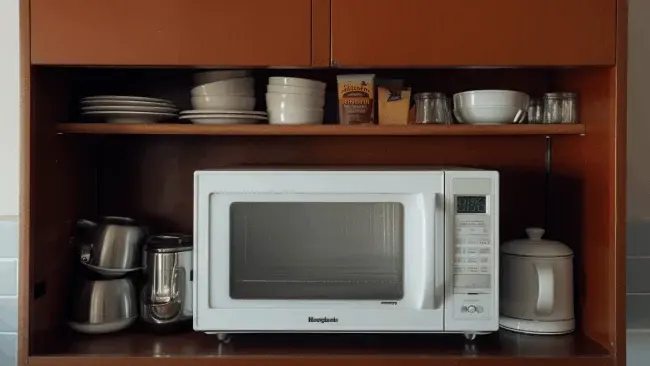
Placing a microwave on a pantry wire shelf can be convenient if it is sturdy enough to support its weight. Before doing so, ensure the wire shelf is strong and stable. This will prevent any accidents or damage caused by an unstable surface.
Make sure to check the maximum weight capacity of the wire shelf and compare it with the weight of your microwave. Also, consider the size of your microwave and whether it will fit properly on the shelf without obstructing other items in your pantry.
Where should I put a microwave in the pantry?
Consider placing your microwave on a sturdy and accessible shelf within the confines of your pantry. We recommend choosing a lower cabinet shelf to avoid mishaps due to weight distribution.
Remember, a broken self in your pantry can cause damage to your other storage space and lead to a big mess in your pantry due to the microwave’s weight.
How high can a microwave go in a pantry?
To maximize the safety and accessibility of your pantry, ensure that the microwave is positioned at a height no higher than shoulder level. This will allow you to easily reach and operate the microwave without straining or risking accidents.
According to our research, the most convenient height for a microwave in a pantry is between 2 inches below and 10 inches above your elbow height.
How much space do you need around a microwave for ventilation?
When placing your microwave in your pantry, ensure adequate clearance on all sides. A well-designed microwave requires 2 to 3 inches of clearance at the top and sides, with at least 1 inch at the rear.
This may seem like a lot of space, but it serves an essential purpose. Sufficient clearance allows for proper airflow and prevents overheating, ensuring optimal performance and longevity of your appliance.
Conclusion
A pantry can be a satisfactory location to store your microwave if the pantry has an electrical outlet and a strong, stable shelf. However, you need to consider some crucial factors before ensuring you can use your microwave safely. Consider any exhaust vents or other ventilation systems when placing a microwave in a pantry, and leave a few inches of space to avoid overheating or damage. With these precautions in mind, a pantry can provide a practical and space-saving solution for your microwave storage needs.