
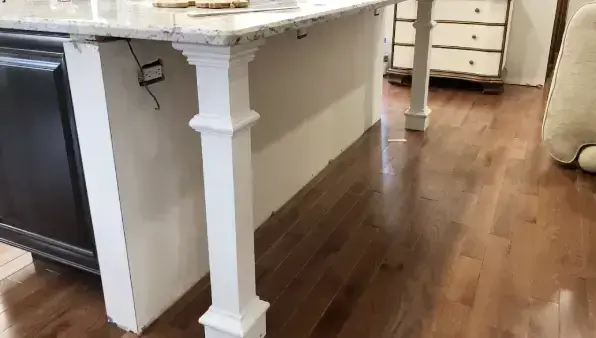
Extending kitchen island with legs is a great option to add extra counter space to your kitchen. This way, you can create an additional workspace to cook, bake, and entertain guests.
You need to construct a sturdy support structure to extend your kitchen island with legs. This structure will use wooden beams or brackets to provide stability and support for the extended portion of the island. Then, attach the table legs securely to the support structure using screws or brackets.
We will discuss all the steps from scratch so that you can extend your kitchen island successfully.
How to Extend Your Kitchen Island with Legs: 9 Steps to Follow
Extending a kitchen island with legs is an excellent way to add more functionality and style to your kitchen. Here is a brief overview of how to extend your kitchen island with legs in 9 simple steps:
- Step #1: Evaluate and Plan the Extension
- Step #2: Gather Materials and Tools
- Step #3: Remove the Existing Countertop
- Step #4: Construct a Support Structure
- Step #5: Attach the Table Legs to the Support Structure Securely
- Step #6: Attach a New Section of the Countertop
- Step #7: Fill Holes and Sand
- Step #8: Prime and Paint
- Step #9: Reassemble and Finalize
Now let’s take a closer look at each step.
Step #1: Evaluate and Plan the Extension
Before you add legs to your kitchen island, consider its current layout, dimensions, and design.
Think about where you want the table legs to go and what features or modifications you might like to add to make it more functional and appealing.
Take measurements of your available space and consider how adding table legs will affect traffic flow in the area.
Step #2: Gather Materials and Tools
After you determine what you want from your kitchen island extension, gather the necessary materials and tools.
You’ll need table legs and support structure components such as wooden beams or brackets for this project. Gather screws, wood filler, sandpaper, paint or stain, and any additional materials based on your specific design plans.
In addition to these materials, you’ll require certain tools like a drill, screwdriver, saw, measuring tape, level, and paint brushes or rollers.
Step #3: Remove the Existing Countertop
Before building, remove any existing countertop materials from the top of your kitchen island using appropriate tools to avoid damaging it.
To remove the existing countertop, lift and detach it gently with a pry bar. Be sure to take your time and be gentle during this process to avoid causing any damage.
Step #4: Construct a Support Structure
Identify the ideal position for the table legs and mark their placement on the existing base before adding legs to your newly expanded kitchen island.
Then, measure and cut wooden beams or brackets to size, ensuring they provide stable support for the extended island.
Once your materials are ready, securely attach the wooden beams or brackets to the island’s base using screws. Make sure they’re level and aligned.
Use a level to check the support structure’s stability to ensure your newly extended workspace is stable and secure.
Step #5: Attach the Table Legs to the Support Structure Securely
After you’ve constructed a sturdy support structure, secure the table legs to it. Use screws or other suitable hardware to fasten each leg in place, ensuring they are aligned with their marked placement on the island’s base.
Check that each leg is level and plumb with a level tool. Make any adjustments before tightening all the screws.
Step #6: Attach a New Section of the Countertop
Now it’s time to seamlessly attach the new section of countertop to your existing surface, adding strength and level to your kitchen.
Determine the desired location and size for the new countertop section and cut the new material to fit those dimensions precisely. Apply adhesive or screw the new section to the existing countertop.
Ensure there’s no gap between them so that they align perfectly. Check if it’s leveled with the existing surface. If not, adjust it accordingly until you get an even surface.
Clean any excess adhesive and ensure a smooth, seamless finish for your extended kitchen island with legs.
Step #7: Fill Holes and Sand
After extending the kitchen island with legs and attaching the new section of the countertop, you have to give it a polished finish.
Fill in any nail or screw holes and any gaps or imperfections with wood filler. Ensure you follow the manufacturer’s instructions for the wood filler and allow it to dry completely.
Once the filler is dry, grab sandpaper and sand the entire extended island, including the existing and new sections.
Be thorough and pay attention to details, ensuring all edges and corners are smooth.
When you’ve finished sanding, wipe away any dust or debris from the surface, preparing it for the next step.
Step #8: Prime and Paint
To make your extended island a statement piece in your home, you’ll want to prime and paint it carefully. Take your time with this step.
Apply a coat of primer to the entire surface using a paintbrush or roller, following the manufacturer’s instructions for drying time. Afterward, apply your chosen paint color or stain using the appropriate application techniques.
Make sure you apply multiple coats as needed, letting each coat dry completely before moving on. This will ensure that your extended island looks professional and polished when complete.
Step #9: Reassemble and Finalize
Now, reassemble and finish the extended kitchen island. Reattach any modified cabinets or drawers to their new locations on the extended island. Make sure to secure them firmly and ensure proper alignment.
Double-check that all components are securely fastened and that everything is properly placed. Take a moment to step back and visually inspect the island to ensure that it meets your expectations in terms of aesthetics and functionality.
Make any necessary adjustments or touch-ups to achieve the desired look. Give the island a thorough cleaning to remove any dust or debris accumulated during the construction.
What type of table legs should you use for the extension?
The choice of table legs depends on your design preferences and the overall style of your kitchen. Popular options include turned legs, post legs, or metal legs.

Turned legs are a classic choice that can add elegance to your island, while post legs offer a more modern look. Metal legs are durable and easy to clean, making them a practical option for high-traffic areas.
How long does it typically take to extend a kitchen island with legs?
The duration of extending a kitchen island using legs can vary depending on several factors. This includes the project’s complexity, the island’s size, and the experience level of the person or team undertaking the task.
On average, this type of project can take a few days to a week to complete. Factors such as the need for additional modifications, customization, and the availability of materials can also affect the timeline.
Also, the drying and curing time for adhesives, wood fillers, primers, and paints matters.
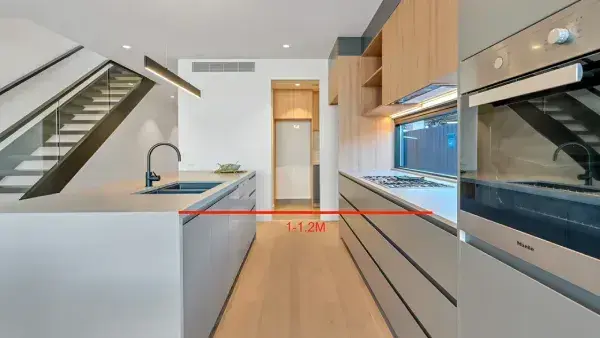
How much clearance do you need for the legs on the kitchen island?
The width of each seat typically determines the recommended clearance for the legs on a kitchen island. The National Kitchen and Bath Association (NKBA) guidelines suggest that each seat should be 24 inches wide.
But, the depth, or knee space, required for clearance may vary based on the height of the countertop.
For a 30-inch-high island, it is recommended to have a knee depth of 18 inches to provide ample space for seated individuals.
If the island is 36 inches in height, the knee depth should be reduced to 15 inches. Similarly, for a 42-inch-high island, a knee depth of 12 inches is sufficient.
Does a kitchen island need to be anchored to the floor?
Anchoring a kitchen island to the floor is necessary for stability and safety. This prevents it from moving or toppling over during use, especially when seating or heavy items are on the countertop.
As kitchen island cabinets cannot be fastened to walls, anchoring them to the floor is essential. Attach a 2″ x 4″ wooden piece to the floor and screw or bracket the cabinet to this support.
What is the most popular kitchen island height?
As professionals recommend, the standard height for kitchen islands is typically 36 inches. This height is versatile and comfortable for various tasks such as food preparation, dining, and socializing.
It’s an ideal compromise between a typical kitchen table seat height and a typical bar stool height, making it suitable for different age groups.
But, the ultimate choice of height depends on personal preferences and the intended use of the island. If the island is mainly for sitting and eating, a 42-inch height creates a bar-like atmosphere.
Transform Your Kitchen with an Extended Island
Extending a kitchen island with legs can be a rewarding project that adds both functionality and style to your kitchen. Following the outlined steps, you can create a seamless extension that meets your specific needs.
Consider factors like clearance for comfortable seating, the choice of table legs, and anchoring the island for stability.
You can achieve a beautiful and practical extended kitchen island with careful planning, the right materials, and attention to detail.
FAQ’s: How to Extend Kitchen Island with Legs
What is the basic idea behind extending a kitchen island with legs?
The basic idea behind extending a kitchen island with legs is to create additional space and functionality in your kitchen. By adding legs to an existing kitchen island, you can create an overhang that provides additional seating or a breakfast bar and also create extra countertop space for cooking and food preparation.
How do I install legs to an existing island?
To install legs to an existing island, you will need to first determine the height of the island and the type of extension you want. You can either extend the countertop or create a new work surface by adding a larger countertop. Once you have determined the height of your kitchen island, you can purchase legs that are the appropriate length and attach them to the bottom of the island using hardware.
Can I add legs to the side of the island?
Yes, you can add legs to the side of the island. This is a great way to add extra space and functionality to a small kitchen. However, you will need to be careful about the placement of the legs so that they do not obstruct the flow of traffic or interfere with the functionality of the island.
Do I need to make the island myself or can I buy a pre-made island?
You can either make the island yourself or buy a pre-made island. If you make the island yourself, you will have more control over the design and materials used, but it will require more time and effort. If you buy a pre-made island, you will have less control over the design, but it will be quicker and easier to install.
What type of legs should I use for my island countertop?
There are many types of legs you can use for your island countertop, including traditional, reeded, twisted, contemporary and mission. You can also find legs in various sizes to suit your kitchen island, countertop or butcher block. The type of legs you choose will depend on your personal style and the design of your kitchen.
Can I use counter stools instead of adding legs to my island?
Counter stools are typically used as seating for a kitchen island and do not provide the necessary support and stability for the countertop. So, it’s recommended to use legs that are designed for supporting a kitchen island countertop.
Conclusion
In conclusion, if you’re looking to add more space and create a bigger, stand-alone look, adding legs to a island or fitting new island legs could be one of the things you’ll want to consider.
By following the steps outlined in this guide, you can successfully extend your island and create a more spacious area for cooking and entertaining.
So, don’t hesitate to add legs to your kitchen island to achieve your desired effect and enjoy the transformation of your kitchen space.