
Installing sliding shelves in your kitchen pantry can transform the way you organize and access your food items and kitchen supplies. With sliding shelves, you can efficiently utilize every inch of your pantry space while maintaining a clear view. But make sure you install sliding shelves in your pantry correctly.
To begin the installation of sliding shelves in your kitchen pantry, remove the existing shelves and clips. Then, carefully select and attach the suitable drawer slides to the pantry’s interior.
Install the sliding shelves onto each drawer once the drawer slides are securely in place. After that, insert the drawers into the pantry and test their smooth functionality by sliding them in and out.
We will guide you through the step-by-step process to install sliding shelves and revolutionize your kitchen pantry organization. So, let’s get started with the installation process.
How to Install Sliding Shelves in Pantry: Step-By-Step Guide
Installing sliding shelves in your pantry requires the following steps:
- Step 1: Empty the Pantry
- Step 2: Measure the Pantry
- Step 3: Remove existing shelves and shelving clips
- Step 4: Build the drawer (Optional)
- Step 5: Choose the right slides
- Step 6: Install the sliding shelves and test-fit
- Step 7: Cut the vertical filler pieces
- Step 8: Mark the locations and plan the shelving layout
- Step 9: Install the vertical filler pieces
- Step 10: Install the drawer glides
- Step 11: Install and test the sliding shelves
Step 1: Empty the Pantry
Before installing sliding shelves in your pantry, you need to empty the cabinet to make ample space for installation and prevent any damage to your belongings.
To remove all items from the kitchen pantry cabinet, take out one shelf at a time and place the items on a nearby countertop or table. Carefully organize the items so that you can easily put them back once the sliding shelves are installed.
Step 2: Measure the Pantry
Once the pantry cabinet is completely empty, you need to measure its interior vertically accurately.
Grab a tape measure and start from the top inside of the cabinet, making your way down to the bottom. Take note of this measurement, as it will determine the height needed for your sliding shelves.
Step 3: Remove Existing Shelves and Shelving Clips
Now, you need to remove the existing shelves and shelving clips carefully. Here’s how you can do it:
- Depress the two plastic retaining clips on one side of each conventional shelf.
- Lift the shelves out by applying gentle pressure on the clips to release them from their holding position.
- Once the clips are released, lift the shelf out from the cabinet.
If there are screws instead of plastic clips, follow these steps:
- Use a screwdriver or power drill to remove the screws holding the shelves in place.
- Carefully lift the shelves out once the screws are removed.
Step 4: Build the Drawer (Optional)
If your existing drawer is flat, consider building a new one. To do so, subtract 1 ½ inches from the width and depth of the shelf to get the shelf bottom dimensions. Cut ¾-inches of birch plywood with a circular saw for the bottom of the shelf.
Use a miter saw with caution to make the shelf frame out of four 1x3s. Clamp the side and back pieces to the plywood bottom, making sure that the plywood bottom edges are flush with the bottom edges of the 1x3s.
Make pilot holes through the 1x3s and plywood, then glue and screw the side and back pieces to the bottom.
You’ll need to drill counterbore holes around the bottom and front pieces, secure the front to the shelf and enlarge the counterbore holes with a pilot hole.
Using drywall screws, attach the front to the sides and bottom of the frame. Sand and finish the shelf as desired.
Step 5: Choose the Right Slides
When selecting drawer slides for your sliding shelves, consider using ball-bearing slides that allow for full access to everything stored in the drawer and provide smooth operation.
Look for drawer slides that match the measurements of your pantry and the weight capacity needed to support your items. Follow the manufacturer’s guidelines for selecting the right slides for your pantry cabinet.
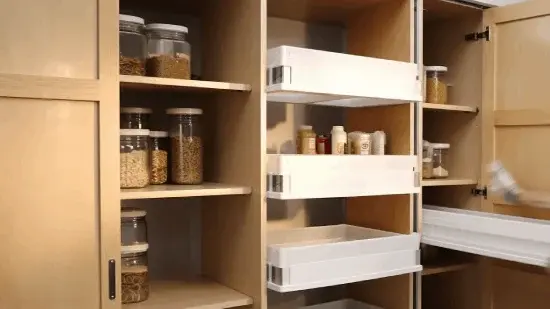
Step 6: Install the Sliding Shelves and Test-Fit
Now, install the sliding shelves by attaching the drawer slides to the sides of the shelves according to the manufacturer’s instructions.
Slide the shelves into the pantry cabinet along the drawer slides and check for any obstructions or misalignment.
Test the sliding shelves by gently pushing and pulling them in and out to ensure they slide smoothly and do not catch on anything. Make any necessary adjustments for a proper fit.
Step 7: Cut the Vertical Filler Pieces
You’ll need 4 vertical filler pieces to attach the drawer glides. Use five-quarter by six-inch primed pine lumber and cut it into vertical strips for installation. Cut the vertical strips down to a thickness of 7/8 of an inch.
Measure the required height from Step 2 and mark the lumber accordingly using a saw or a cutting tool to make precise cuts.
Step 8: Mark the Locations and Plan the Shelving Layout
Use a pencil or a marker to mark the locations on vertical filler pieces for each shelf. Clearly mark these positions for reference during the installation process.
Organize the order of the sliding shelves based on the measurements taken and the items you plan to place on the shelves. Consider the spacing between the shelves to accommodate various items.
Step 9: Install the Vertical Filler Pieces
Begin installing the vertical strips by securing them to the cabinet using 1 5/8-inch construction screws.
Place the strips vertically inside the cabinet at the locations marked earlier. Use a level to ensure that the strips are perfectly vertical.
Once level, add more screws to secure them permanently. The vertical filler pieces will provide support for the sliding shelves.
Step 10: Install the Drawer Glides
Now, drill holes and install the drawer glides over the marked line according to the manufacturer’s instructions. Use a magnetic torpedo level to ensure the glides are level.
This will ensure that the sliding shelves operate smoothly without any tilting. Verify with a small piece of wood across both drawer glides to ensure they are aligned and level.
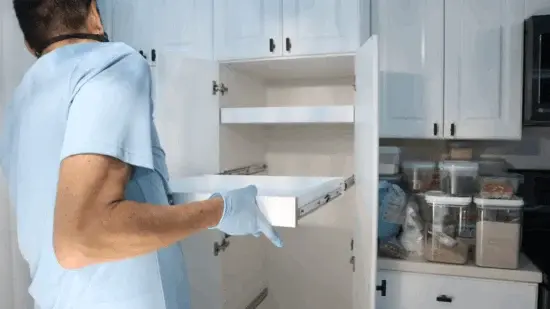
Step 11: Install and Test the Sliding Shelves
As soon as the drawer glides have been installed, it is time to install and test the sliding shelves.
Carefully slide the first shelf onto the drawer glides, ensuring it moves smoothly without any obstructions. Push it all the way in to test its full extension and smooth operation. Make any necessary adjustments to ensure proper functionality.
Repeat this process for each sliding shelf, confirming that they all operate smoothly and without any issues.
How Do You Maintain Sliding Pantry Shelves?

To maintain sliding pantry shelves, we recommend that you take some action. The following are among them:
1. Regular Cleaning
Our suggestion is that you regularly clean your sliding shelves with a damp cloth or mild cleaning solution to maintain their pristine appearance.
To clean, remove all items from the sliding shelves and clear them out periodically. Once you’ve taken everything off the shelves, use a wet cloth or mild cleaning solution to wipe down the shelves and remove any spills, crumbs, or debris.
Be sure to clean every nook and cranny to ensure the shelves remain clean and hygienic. Also, ensure the glides and slides are free from dust and dirt to ensure smooth operation.
2. Check for Loose Screws
Another critical aspect of maintaining your sliding pantry shelves is to check regularly for loose screws and fasteners. Over time, these fittings can become loose, leading to instability and even damage to your shelves.
By inspecting the screws and tightening any loose ones, you can ensure that your sliding pantry shelves remain securely attached to the cabinet.
Also, checking screws regularly can save you from larger repair bills down the line and help increase the lifespan of your sliding pantry shelves.
3. Assess for Wear and Damage
Monitoring the condition of the drawer glides and slides is essential to ensure that your sliding pantry shelves function properly.
Over time, these parts can wear down, leading to misalignment, sticking, or even breaking. So, we advise you to regularly assess these parts’ wear and damage. If you observe any signs of wear, such as a rough or scratchy feel, immediately replace those parts.
4. Avoid Overloading
To ensure the longevity of your sliding shelf system, you need to be mindful of the weight capacity and evenly distribute the load across each level.
Overloading the shelves with heavy items can strain the glides and slides, leading to wear and damage.
Distributing the weight evenly prevents excessive strain on any one part. This will help maintain its functionality and prevent potential issues in the future.
5. Organize Items Thoughtfully
Thoughtfully organizing pantry items is key to maintaining your sliding pantry shelves. Overcrowding and stacking items too high can cause them to fall off the shelves when they slide out, making a mess and potentially causing damage.
Arranging pantry items in an organized manner will prevent clutter, making it easier to locate items promptly. Keeping the pantry organized also helps prevent any damage to your sliding pantry shelves, which may result from overcrowding or overuse.
6. Address Sticking or Misalignment
If your sliding shelves start sticking or become misaligned, address the problem promptly. Start by checking for any obstructions, debris, or loose parts that may impede smooth operation.
Once you’ve identified the cause of the issue, make any necessary adjustments or repairs to restore proper functionality. Taking swift action to address the situation can prevent the problem from escalating and save you from costly repairs in the future.
Frequently Asked Questions
We have found people ask a lot of questions about sliding shelves in the kitchen pantry. Here are some questions you might find helpful.
Do I need to apply lubrication to the sliding shelves in the kitchen pantry?
We highly recommend lubricating the sliding shelves in the kitchen pantry for smooth and effortless operation. A spray-dry lubricant is the preferred method, but according to our findings, wax also works.
Applying the lubricant to the runners or drawer glides will help reduce friction and ensure that the sliding shelves slide in and out with ease.
You can simply spray the dry lubricant or rub a candle on the runners to keep the shelves working smoothly and prevent sticking or misalignment.
How much weight can kitchen sliding shelves typically hold?
Kitchen sliding shelves have varying weight capacities depending on the type of drawer slides utilized. The standard drawer slides and rails can support weight ranges from 20 to 100 lbs, making them suitable for lighter items and everyday kitchen essentials.
For heavier loads, shelves equipped with steel-grade rails can handle weight ranges from 100 to 200 lbs. These heavy-duty slides are perfect for storing bulkier items, canned goods, and larger kitchen appliances.
Are sliding shelves compatible with all types of pantry cabinets?
Sliding shelves are generally compatible with most types of pantry cabinets, but compatibility may vary depending on the specific design and dimensions of the cabinet.

You need to ensure that the pantry cabinet has adequate space to accommodate the sliding shelves and that the dimensions are appropriate for the type of drawer slides being used.
Consider the cabinet’s weight capacity and the slides’ quality to ensure the shelves can support the intended load.
Conclusion
So, you know how to install sliding shelves in your kitchen pantry. Following the step-by-step instructions above, you can transform your pantry organization and make accessing your food items and kitchen supplies a breeze.
Remember to measure accurately, choose the right slides, and test the shelves for smooth operation. Also, maintaining your sliding shelves is essential for their longevity and functionality.
Regular cleaning, checking for loose screws, and thoughtful organization will ensure your sliding pantry shelves serve you well for a long time.
Enjoy the convenience and efficiency of your newly installed sliding shelves and take your pantry organization to the next level.