
Trimming your kitchen island is an excellent way to give it a stunning look that will impress all who enter your kitchen. By adding trim, you can create a beautiful focal point in the room and enhance the overall aesthetic appeal of your space.
To trim your kitchen island, measure the island’s size and shape so that your trim fits perfectly. Then, prep the island by cleaning it thoroughly. After that, cut the trim to size and attach the trim securely to the island using nails or glue. Keep repeating these steps until the island is exactly how you want it.
Today, we will talk about trimming your kitchen island step-by-step. We’ll cover everything from choosing the right type of trim for your island to attaching it securely. So, keep reading for detailed information.
Jump to Section
How to Trim a Kitchen Island for a Stunning Look: 9 Easy Steps

Trimming a kitchen island can completely transform the look of your kitchen. With the right tools and techniques, you can achieve a stunning and polished finish that will give your kitchen a new feel.
Here’s how to do it in just a few easy steps including tools and materials needed:
Tools and Materials Needed
| Tools | Materials |
|---|---|
| Tape measure | Trim boards (such as baseboard or 1×3/1×4 boards) |
| Miter saw or miter box | Corbels or decorative trim (optional) |
| Nail gun or hammer | Wood putty or wood filler, Caulk |
| Pin nails or finish nails | Sandpaper, Paint or stain |
| – | Safety goggles, Protective gloves, Dust mask |
Step 1: Measure and Plan for Trim
Measure the dimensions of your kitchen island and sketch out a trim design that fits your desired style. This will give you an idea of how much molding you must purchase. When measuring your island, account for any overhanging edges or protrusions requiring additional trimming.
Once you’ve measured and sketched out a plan for your trim design, consider the style and aesthetic you want to achieve. Do you want something simple and clean, or are you looking for something more intricate? Consider the overall look of your kitchen and choose a design that complements it.
Step 2: Clean the Kitchen Island
Before beautifying your kitchen island, you’ll want to clear away any clutter and remove molding or trim. This will ensure that the new trim installation goes smoothly and that the result looks polished.
You should also clean the island’s surface thoroughly so it’s free of dust and debris. Once you have cleared the area, use a putty knife or scraper to smooth out any rough spots on the surface of your kitchen island.
If there are any gaps or uneven areas, fill them with wood filler or spackling compound and sand them down until they’re flush with the surface. This will create a clean and even base for your new trim installation.
Step 3: Cut the Trim to Size
Now it’s time to get creative with your design plan by exploring different trim styles and patterns for your kitchen island.
Consider popular options like the X-detail, craftsman-style baseboard, corbels, or board and batten. You can also experiment with detailed molding or shiplap designs to add a touch of personality to your space.
Once you’ve chosen your desired trim style, measure and mark the boards according to your design plan. Then, use a miter saw or box to make precise angled cuts on the trim boards.
Remember to account for corner angles and any necessary adjustments for non-square areas.
Step 4: Attach the Trim to the Island
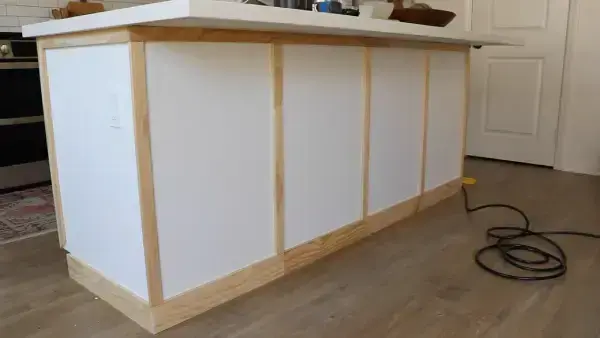
Before pushing each trim board firmly against the wall, apply a thin bead of construction adhesive along your island’s backside edges and corners. This will help prevent gaps or movement once the trim is attached.
Once you have applied the adhesive, press the board firmly against the island, ensuring it aligns with the edges and corners. After positioning the trim board, it’s time to secure it in place using pin nails or finish nails.
Using a nail gun or hammer, place nails at regular intervals along the length of the trim board to ensure that it penetrates its surface. You may also need to notch and fit uneven areas or corners as necessary for a snug fit.
Step 5: Repeat for Other Sides and Corners
Remember to repeat this process for each side of your kitchen island. Ensure the trim boards are flush with the top of the countertop along each side of the island. Use nails to secure them, hammering them into the studs behind the drywall.
For corners, measure and mark where you need to make your miter cuts. Cut each end at a 45-degree angle using a table or hand saw, ensuring that both pieces fit perfectly at a right angle.
Nail them into place, taking care not to split or damage the wood. Repeat this step for all four corners of your kitchen island until all sides are evenly trimmed and secured.
Step 6: Add Decorative Trim or Corbels (Optional)
If you want to spruce up the appearance of your culinary hub, consider incorporating decorative trim pieces or corbels for added flair. This is an optional step that makes your kitchen island look better.
To begin, measure and cut the decorative trim to fit each side of your island. Next, attach the trim using the method described in the previous steps. Make sure it’s secure and flush with the surface of your island.
Corbels are also a great option for adding dimension and character to your kitchen island. Simply choose a style that complements your overall design aesthetic and attach them securely underneath each corner of your island.
Step 7: Fill Holes and Caulk Edges
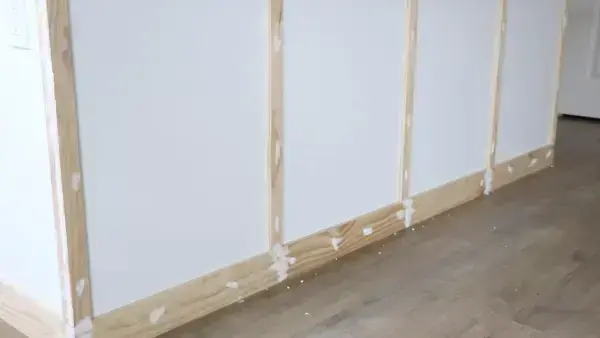
Now it’s time to put your woodworking skills to the test and ensure that your finishing details are perfect. Start by checking the kitchen island for any visible nail holes and filling them with putty or wood filler.
Use a putty knife to level the surface of the filled area. Sand rough spots until the surface is smooth and even.
Wait for the wood filler or putty to dry according to the manufacturer’s instructions. Then, apply caulk along the edges where the trim meets the island. This will give your kitchen island a clean and polished appearance.
Use a caulking gun for precision and to apply an even line of caulk material. Make sure you squeeze excess caulk gently.
Step 8: Paint or Stain the Trims
To elevate the overall aesthetic of your custom-built kitchen island, you should consider applying a coat of paint or stain to the ornate trims. Follow the manufacturer’s instructions for the chosen product to ensure proper application and drying time.
Begin by preparing the surface of the trims before painting or staining. Sand any rough spots or uneven areas with fine-grit sandpaper, then wipe down with a clean cloth to remove dust particles.
Once properly prepared on the surface, apply multiple coats of paint or stain as needed. Ensure sufficient drying time between each coat, following the manufacturer’s recommended waiting period.
Note: Work in long, even strokes along the length of each trim piece to achieve a more professional finish.
Step 9: Final Touches and Clean-up
After completing the painting or staining, inspect and touch up any imperfections on the trims and surrounding areas. Look closely at every corner and edge of the kitchen island trim to ensure that each section has been painted or stained evenly.
If you notice any missed spots or uneven coverage, use a small paintbrush to touch up these areas precisely. You should also check the trim for any nicks, scratches, or other imperfections that may have happened during installation.
Use wood filler to fill gaps or holes and sand down rough edges until smooth. After all touch-ups are done, clean up your workspace by removing all tools, materials, and debris.
Do you put trim around a kitchen island top?
Trimming around your kitchen island top is important. Doing so can quickly and easily elevate the look of your kitchen by providing a polished finish that adds character and charm. Trim creates a seamless transition between the countertop and the island’s base, resulting in a cohesive look that ties everything together.
Using boards that match or complement your existing cabinetry is best for a more cohesive look. Measure and cut the boards precisely to fit snugly and flush against each other. Once installed, sand any rough edges and fill nail holes with wood filler.
How much space do you need on the sides of a kitchen island?
Ensure your kitchen island stands out as a stunning focal point by occupying 42 to 48 inches of space. This space is essential to ensure your kitchen looks and functions at its best. It allows for easy movement around the island, even if more than one person is in the kitchen.
To make sure you’ve got enough space, measure carefully. Remember to consider any appliances or cabinets attached to the island, as well as the width of the trim. Also, clearing enough space will prevent accidents like bumping into corners or cabinets.
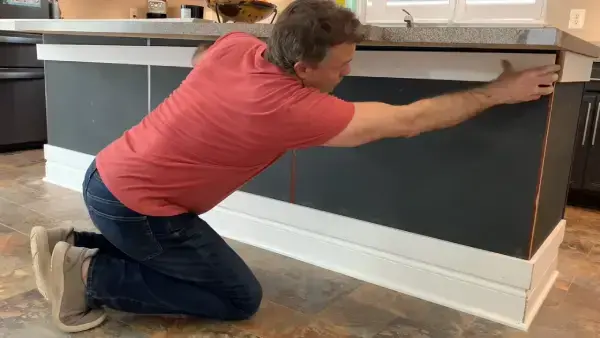
How do you attach wood trim to countertops?
To attach wood trim to your countertops, use silicone caulk or glue to secure it. A strong and waterproof adhesive like Liquid Nails is ideal for kitchen settings.
Clean and dry both surfaces before applying the adhesive for a better bond. Press the wood strip firmly onto the surface and hold it until it dries completely. This ensures a seamless finish and proper alignment with adjacent tiles.
Enhance Your Kitchen Instantly: Add Trim to Your Island
Trimming a kitchen island can enhance the appearance of your kitchen. Adding trim around the top and sides of your island can create a stunning focal point that draws attention to this important area of your home.
When attaching the trim to your kitchen island, use proper tools and techniques such as adhesive or nails. Also, leave enough space on the sides of your island for comfortable movement and functionality in the kitchen.
These steps will help you add wood trim to countertops and get a flawless finish.
FAQ’s: How to Trim a Kitchen Island
What is trimming a kitchen island?
Trimming a kitchen island is a way to add decorative elements to the sides, edges, and bottom of the island to give it a custom look and finish.
Why trim a kitchen island?
Trimming a kitchen island gives it a finished look and allows you to add your personal touch to your kitchen. It also covers up any unsightly gaps and rough edges or seams.
What materials do I need to trim a kitchen island?
You will need basic materials such as trim pieces, caulk, wood filler, putty, finishing nails, miter saw, and a nailer. You can use poplar board or any other type of wood you prefer depending on your preference.
Can I buy pre-made kitchen island trim pieces?
Yes, you can buy pre-made trim pieces at home improvement stores such as Home Depot or through affiliate links online. This can make the process easier and faster.
What trim pieces should I use?
You can use any type of trim pieces you prefer such as baseboard trim, corbel, or decorative trim. Choose trim pieces that complement the style of your kitchen.
How do I install trim on the back of the island?
To install trim on the back of the island, measure the length and width of the area and cut the trim pieces to size. Attach them to the island with a nailer and fill in the nail holes with putty or wood filler.
Conclusion
In conclusion, the renovation of your kitchen island using moulding and custom trim work can elevate its overall look and give it a complete makeover.
Choosing DIY kitchen island trim ideas for your renovation can be economical and also give your kitchen a personal touch. If you don’t have a kitchen island yet, these ideas can be ideal for starting a DIY kitchen island project.
Remember, the aim is not only to fix and makeover the existing structure but also to enhance the aesthetics and functionality of the kitchen island with trim.
Good luck with your kitchen island makeover!